Over the past several weeks, I have been learning x86_64 assembly, AArch64 assembly, and various basics. Recently, I finally had my very first experience with reverse engineering. I am glad to share more details about my experience.
What is reverse engineering
A computer is really a rather dumb machine. It will not solve any problem on its own; it only executes the solution — specifically, it only executes instructions from humans one by one in order. To solve a problem with such a machine, we typically:
- analyse a problem;
- find a solution for that problem;
- implement the solution by designing an algorithm;
- implement the algorithm by writing code;
- produce the executable from the code by compiling;
- feed that executable to that dumb computer to solve the problem.
This is a procedure to convert the solution into code, and then into instructions.
Usually, we can easily understand what a program does by reading the code. This is the middle ground between the solution and the instructions. In the 1970s, code was usually shared among people, so everyone could study, improve, and share solutions within the community.
However, things have changed since the emergence of those extremely evil proprietary software development monsters. They choose to deny the people access to the code, take away users’ control over their computing, implement all kinds of malicious functionality to exploit their users, and use all kinds of approaches to hide what their programs do — the solution. They are building barriers. They are ruining sharing. They are creating disasters and despair. They do everything against the people, the community, and humanity. They do all this for their unethical and unjust profits.
Software should serve the people, not the capitalists’ unethical and unjust profits. However, it is those unethical and unjust proprietary software developers, who should never exist and should be expunged from the world, that are making the world worse. But we cannot eliminate proprietary software all at once. We develop free software replacements for that, and take back control over computing gradually.
Therefore, it is time to do the procedure above in reverse order. In other words, we:
- analyse the executable;
- try to recover the code that does what the executable does;
- find the algorithm the code implements;
- reverse the solution the algorithm implements;
- re-implement the solution to solve the problem.
This is the conversion from instructions to code, and then to solution.
The practice of doing such a thing in reverse order is reverse engineering, aka. RE.
Why reverse engineering matters
The most significant reason why reverse engineering matters is that it helps us to port free software operating systems, such as postmarketOS and LineageOS, to various devices. This is also the main reason I am learning reverse engineering.
On desktop PCs, software freedom is much easier to achieve, as we can usually run all kinds of free GNU/Linux distributions without severe problems. However, on mobile devices, such as smartphones or tablets, this is not the case.
These devices often have many vendor-specific and device-specific tweaks, and it is almost impossible to find a one-size-fits-all solution to get a free OS running on these devices universally. Even worse, manufacturers are choosing to hide those technical details, and even Google chose not to release the device trees and vendor blobs anymore. Therefore, we now have to analyse the binary firmware blobs and infer their logic in order to get postmarketOS, LineageOS, or other free software operating systems running on those devices.
Actually, the Free Software Foundation is also working on this issue under the Librephone project. This project cannot continue without reverse engineering.
However, the application of reverse engineering is by no means limited to free OS porting. It also matters a lot in:
- figuring out the details of proprietary protocols,
- finding evidence of malicious functionality in proprietary software,
- Digital Restrictions Management circumvention,
- and much more.
How to do reverse engineering
Typical reverse engineering consists of these two steps:
- Convert the executable to assembly; this process is called disassembling.
- Try to recover the ideas or rewrite equivalent code by reading the assembly code.
We can do this directly on the executable without running it, known as static analysis, or while it is running, known as dynamic analysis.
Static analysis example
Take this for example:
#include <stdio.h>
#include <string.h>

const char *PASS = "weakpasswd";

int main()
{
    char buf[64];
    for (int i = 0; i < 3; i++)
    {
        printf("%d retries remaining.\nPassword: ", 3 - i);
        fgets(buf, sizeof buf, stdin);
        if (strncmp(PASS, buf, strlen(PASS)))
            puts("Wrong password!\n");
        else
        {
            puts("Correct!\nWelcome to the world "
                 "of reverse engineering!\n");
            break;
        }
    }
    return 0;
}
Compile this with GCC:
$ gcc -o ./demo ./demo.c
Open the executable in radare2:
$ r2 ./demo
You will see this:
[0x00000800]>
Let’s analyse the executable:
[0x00000800]> aaa
INFO: Analyze all flags starting with sym. and entry0 (aa)
INFO: Analyze imports (af@@@i)
INFO: Analyze entrypoint (af@ entry0)
INFO: Analyze symbols (af@@@s)
INFO: Analyze all functions arguments/locals (afva@@F)
INFO: Analyze function calls (aac)
INFO: Analyze len bytes of instructions for references (aar)
INFO: Finding and parsing C++ vtables (avrr)
INFO: Analyzing methods (af @@ method.*)
INFO: Finding function preludes (aap)
INFO: Emulate functions to find computed references (aaef)
INFO: Recovering local variables (afva@@@F)
INFO: Type matching analysis for all functions (afft)
INFO: Propagate noreturn information (aanr)
INFO: Use -AA or aaaa to perform additional experimental analysis
INFO: Finding xrefs in noncode sections (e anal.in=io.maps.x; aav)
WARN: Skipping aav because base address is zero. Use -B 0x800000 or aav0
List the functions:
[0x00000800]> afl
0x00000750    1     16 sym.imp.strlen
0x00000760    1     16 sym.imp.__libc_start_main
0x00000770    1     16 sym.imp.__cxa_finalize
0x00000780    1     32 sym.imp.strncmp
0x000007a0    1     16 sym.imp.abort
0x000007b0    1     16 sym.imp.puts
0x000007c0    1     16 sym.imp.printf
0x000007d0    1     20 sym.imp.fgets
0x00000800    1     48 entry0
0x00000834    3     20 sym.call_weak_fn
0x00000860    4     48 sym.deregister_tm_clones
0x00000890    4     60 sym.register_tm_clones
0x000008cc    5     80 entry.fini0
0x00000920    1      8 entry.init0
0x000009f8    1     24 sym._fini
0x00000928    7    208 main
0x00000708    1     28 sym._init
0x00000730    1     32 fcn.00000730
We can now step into the main function and print the disassembly:
[0x00000800]> s main
[0x00000928]> pdf
            ; DATA XREF from entry0 @ 0x820(r)
            ; DATA XREF from entry.fini0 @ 0x8e0(r)
┌ 208: int main (int argc);
│ `- args(x0) vars(5:sp[0x4..0x70])
│           0x00000928      fd7bb9a9       stp x29, x30, [sp, -0x70]!
│           0x0000092c      fd030091       mov x29, sp
│           0x00000930      f30b00f9       str x19, [var_10h]
│           0x00000934      ff6f00b9       str wzr, [var_6ch]          ; argc
│       ┌─< 0x00000938      29000014       b 0x9dc
│       │   ; CODE XREF from main @ 0x9e4(x)
│      ┌──> 0x0000093c      61008052       mov w1, 3
│      ╎│   0x00000940      e06f40b9       ldr w0, [var_6ch]
│      ╎│   0x00000944      2000004b       sub w0, w1, w0
│      ╎│   0x00000948      e103002a       mov w1, w0
│      ╎│   0x0000094c      00000090       adrp x0, 0
│      ╎│   0x00000950      00a02891       add x0, x0, str._d_retries_remaining._nPassword: ; 0xa28 ; "%d retries remaining.\nPassword: " ; const char *format
│      ╎│   0x00000954      9bffff97       bl sym.imp.printf           ; int printf(const char *format)
│      ╎│   0x00000958      e00000f0       adrp x0, 0x1f000
│      ╎│   0x0000095c      00e447f9       ldr x0, [x0, 0xfc8]         ; [0x1ffc8:4]=0
│      ╎│                                                              ; reloc.stdin
│      ╎│   0x00000960      010040f9       ldr x1, [x0]                ; int size
│      ╎│   0x00000964      e0a30091       add x0, sp, 0x28            ; char *s
│      ╎│   0x00000968      e20301aa       mov x2, x1                  ; FILE *stream
│      ╎│   0x0000096c      01088052       mov w1, 0x40
│      ╎│   0x00000970      98ffff97       bl sym.imp.fgets            ; char *fgets(char *s, int size, FILE *stream)
│      ╎│   0x00000974      00010090       adrp x0, reloc.strlen       ; 0x20000
│      ╎│   0x00000978      00600191       add x0, x0, 0x58
│      ╎│   0x0000097c      130040f9       ldr x19, [x0]               ; [0xa18:4]=0x6b616577 ; "weakpasswd"
│      ╎│   0x00000980      00010090       adrp x0, reloc.strlen       ; 0x20000
│      ╎│   0x00000984      00600191       add x0, x0, 0x58
│      ╎│   0x00000988      000040f9       ldr x0, [x0]                ; [0xa18:4]=0x6b616577 ; "weakpasswd" ; const char *s
│      ╎│   0x0000098c      71ffff97       bl sym.imp.strlen           ; size_t strlen(const char *s)
│      ╎│   0x00000990      e10300aa       mov x1, x0
│      ╎│   0x00000994      e0a30091       add x0, sp, 0x28
│      ╎│   0x00000998      e20301aa       mov x2, x1                  ; size_t n
│      ╎│   0x0000099c      e10300aa       mov x1, x0                  ; const char *s2
│      ╎│   0x000009a0      e00313aa       mov x0, x19                 ; const char *s1
│      ╎│   0x000009a4      77ffff97       bl sym.imp.strncmp          ; int strncmp(const char *s1, const char *s2, size_t n)
│      ╎│   0x000009a8      1f000071       cmp w0, 0
│     ┌───< 0x000009ac      a0000054       b.eq 0x9c0
│     │╎│   0x000009b0      00000090       adrp x0, 0
│     │╎│   0x000009b4      00402991       add x0, x0, str.Wrong_password__n ; 0xa50 ; "Wrong password!\n" ; const char *s
│     │╎│   0x000009b8      7effff97       bl sym.imp.puts             ; int puts(const char *s)
│    ┌────< 0x000009bc      05000014       b 0x9d0
│    ││╎│   ; CODE XREF from main @ 0x9ac(x)
│    │└───> 0x000009c0      00000090       adrp x0, 0
│    │ ╎│   0x000009c4      00a02991       add x0, x0, str.Correct__nWelcome_to_the_world_of_reverse_engineering__n ; 0xa68 ; "Correct!\nWelcome to the world of reverse engineering!\n" ; const char *s
│    │ ╎│   0x000009c8      7affff97       bl sym.imp.puts             ; int puts(const char *s)
│    │┌───< 0x000009cc      07000014       b 0x9e8
│    ││╎│   ; CODE XREF from main @ 0x9bc(x)
│    └────> 0x000009d0      e06f40b9       ldr w0, [var_6ch]
│     │╎│   0x000009d4      00040011       add w0, w0, 1
│     │╎│   0x000009d8      e06f00b9       str w0, [var_6ch]
│     │╎│   ; CODE XREF from main @ 0x938(x)
│     │╎└─> 0x000009dc      e06f40b9       ldr w0, [var_6ch]
│     │╎    0x000009e0      1f080071       cmp w0, 2
│     │└──< 0x000009e4      cdfaff54       b.le 0x93c
│     │     ; CODE XREF from main @ 0x9cc(x)
│     └───> 0x000009e8      00008052       mov w0, 0
│           0x000009ec      f30b40f9       ldr x19, [var_10h]
│           0x000009f0      fd7bc7a8       ldp x29, x30, [sp], 0x70
└           0x000009f4      c0035fd6       ret
Radare2 will not only give us the assembly code, but also each instruction’s corresponding address and the calling relationships among them.
However, it is still not so clear now. So let’s show the disassembly in a graph:
[0x00000928]> VV
You will now see:
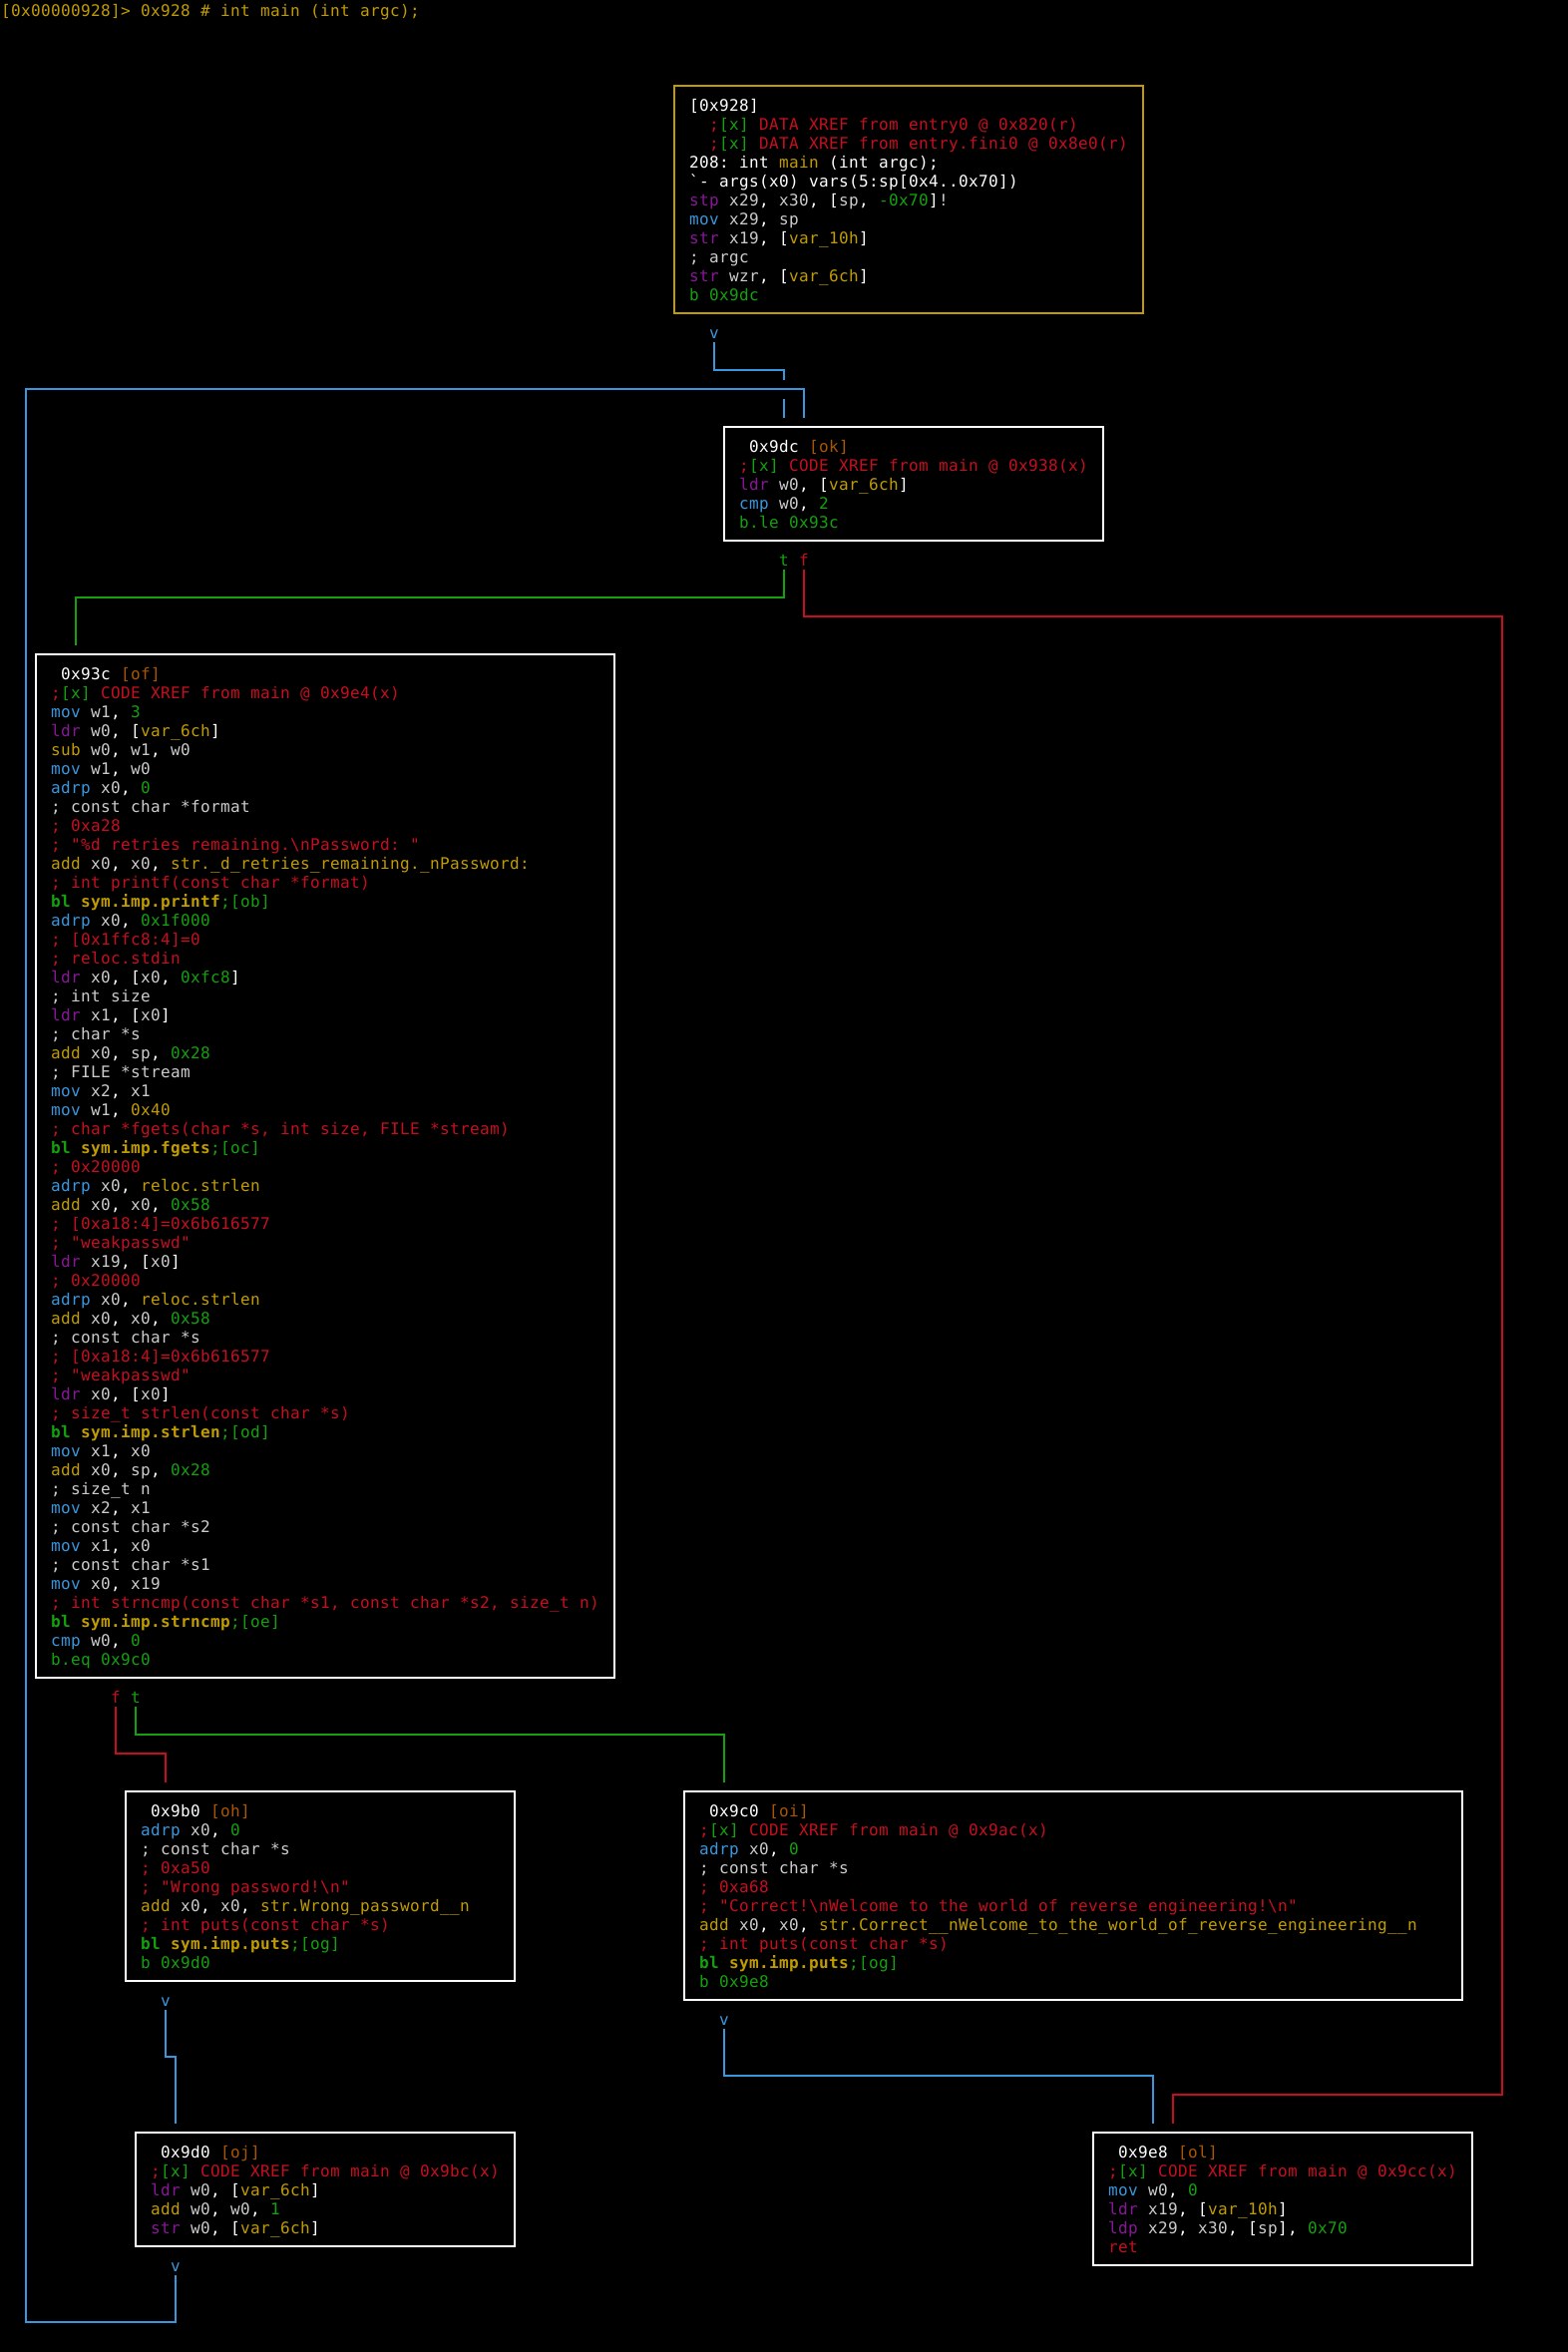
In the graph, t means jump when the condition is true. f means jump when the condition is false. v means unconditional jump.
Now life becomes much easier. Radare2 has already figured out the logical relationships between the assembly code pieces, and you only need to figure out the assembly code pieces themselves.
In the graph, we can easily find the password checking logic at the end of the [0x93c] block:
; int strncmp(const char *s1, const char *s2, size_t n)
bl sym.imp.strncmp
cmp w0, 0
b.eq 0x9c0
Here it calls sym.imp.strncmp, and then checks the value returned in w0 by that function. If it equals 0, it will jump to the [0x9c0] block, indicating success. Otherwise it will continue to the [0x9b0] block, indicating failure.
According to the AArch64 calling convention, the pointers to the two strings to be compared are in the registers x0 and x1, respectively, then we call sym.imp.strncmp. The result is then stored in the x0 register (w0 is just the lower half of x0), and if the two strings are identical, we get 0.
Now we scan backwards and see:
mov x0, x19
Then scan back further to find the instruction operating on x19:
; [0xa18:4]=0x6b616577
; "weakpasswd"
ldr x19, [x0]
Radare2 has already told us the top secret. Let’s try it:
$ ./demo
3 retries remaining.
Password: weakpasswd
Correct!
Welcome to the world of reverse engineering!
That’s it.
If we look more closely at the graph, we can learn more than just the password. For example, we can see a cycle in the graph: [0x9dc] -> [0x93c] -> [0x9b0] -> [0x9d0] -> [0x9dc]. In a graph, a cycle often indicates loop control flow. This is a very important reverse engineering mindset.
In the [0x9dc] block:
ldr w0, [var_6ch]
cmp w0, 2
b.le 0x93c
It loads the variable var_6ch into a register and compares it with 2. If it is larger, it proceeds to the [0x9e8] block and quits. Otherwise, it proceeds to the [0x93c] block.
Look at the end of the [0x93c] block. We already know that if the password check succeeds, it will jump to the [0x9c0] block, print the message indicating success, and then jump to the [0x9e8] block, which ends the program.
But what if the check fails? It will proceed to the [0x9b0] block. It simply prints the error message, so there is nothing interesting here; let us skip to the [0x9d0] block. Here we find something interesting:
ldr w0, [var_6ch]
add w0, w0, 1
str w0, [var_6ch]
It loads the variable var_6ch into a register, increments the value by one, and stores the value back. Then it goes back to the [0x9dc] block, which checks the value of var_6ch.
Press q twice to return to the prompt. Run afv and afvd to list variables and their information:
[0x000009b0]> afv
arg int argc @ x0
var int64_t var_70h @ sp+0x0
var int64_t var_70h_2 @ sp+0x8
var int64_t var_10h @ sp+0x10
var char * s2 @ sp+0x28
var int64_t var_6ch @ sp+0x6c
[0x000009b0]> afvd
arg argc = 0x00000000 0x00010102464c457f   .ELF.... @ pstate
var var_6ch = 0x0017806c = (qword)0x0000000000000000
var s2 = 0x00178028 = ""
var var_10h = 0x00178010 = (qword)0x0000000000000000
var var_70h = 0x00178000 = (qword)0x0000000000000000
var var_70h_2 = 0x00178008 = (qword)0x0000000000000000
We can see that the value var_6ch is an int64_t, and its initial value is 0.
Now we can infer that var_6ch is a counter. Its initial value is 0. If a password check fails, the counter is incremented by one. Once it exceeds 2, the program will no longer ask for the password and will exit. Now we can tell that this corresponds to our C code for (int i = 0; i < 3; i++)!
However, this is a very simple example. In the real world, things become harder, as proprietary software developers often use anti-analysis and anti-debugging techniques.
Understanding compiler optimisations
Now, let’s compile this even simpler code:
#include <stdio.h>

int main()
{
    int a;
    scanf("%d", &a);
    printf("%d", a % 65536);
    return 0;
}
It loads an integer from the input, and outputs its modulo 65536.
Disassemble its main function:
[0x00000700]> aaa
INFO: Analyze all flags starting with sym. and entry0 (aa)
......
WARN: Skipping aav because base address is zero. Use -B 0x800000 or aav0
[0x00000700]> s main
[0x00000828]> pdf
            ; DATA XREF from entry0 @ 0x720(r)
            ; DATA XREF from entry.fini0 @ 0x7e0(r)
┌ 76: int main (int argc, char **argv, char **envp);
│ afv: vars(3:sp[0x4..0x20])
│           0x00000828      fd7bbea9       stp x29, x30, [sp, -0x20]!
│           0x0000082c      fd030091       mov x29, sp
│           0x00000830      e0730091       add x0, sp, 0x1c
│           0x00000834      e10300aa       mov x1, x0
│           0x00000838      00000090       adrp x0, 0
│           0x0000083c      00602291       add x0, x0, 0x898
│           0x00000840      94ffff97       bl sym.imp.__isoc23_scanf
│           0x00000844      e01f40b9       ldr w0, [var_1ch]
│           0x00000848      e103006b       negs w1, w0
│           0x0000084c      003c0012       and w0, w0, 0xffff
│           0x00000850      213c0012       and w1, w1, 0xffff
│           0x00000854      0044815a       csneg w0, w0, w1, mi
│           0x00000858      e103002a       mov w1, w0
│           0x0000085c      00000090       adrp x0, 0
│           0x00000860      00602291       add x0, x0, 0x898           ; const char *format
│           0x00000864      97ffff97       bl sym.imp.printf           ; int printf(const char *format)
│           0x00000868      00008052       mov w0, 0
│           0x0000086c      fd7bc2a8       ldp x29, x30, [sp], 0x20
└           0x00000870      c0035fd6       ret
You may be confused, because you cannot see anything about a modulo operation (sdiv, mul, sub, etc.) here. Instead, you see:
and w0, w0, 0xffff
and w1, w1, 0xffff
This is because modern compilers are smart enough to detect some special computation patterns and optimise them into simpler instructions. 65536 is 2^16, so the binary number modulo 65536 is just its least significant 16 bits. A bitwise operation is enough; there is no need for adders or multipliers.
However, if we change 65536 to something else, for example, 50000, that is no longer the case:
            ; DATA XREF from entry0 @ 0x720(r)
            ; DATA XREF from entry.fini0 @ 0x7e0(r)
┌ 80: int main (int argc, char **argv, char **envp);
│ afv: vars(3:sp[0x4..0x20])
│           0x00000828      fd7bbea9       stp x29, x30, [sp, -0x20]!
│           0x0000082c      fd030091       mov x29, sp
│           0x00000830      e0730091       add x0, sp, 0x1c
│           0x00000834      e10300aa       mov x1, x0
│           0x00000838      00000090       adrp x0, 0
│           0x0000083c      00602291       add x0, x0, 0x898
│           0x00000840      94ffff97       bl sym.imp.__isoc23_scanf
│           0x00000844      e01f40b9       ldr w0, [var_1ch]
│           0x00000848      016a9852       mov w1, 0xc350
│           0x0000084c      020cc11a       sdiv w2, w0, w1
│           0x00000850      016a9852       mov w1, 0xc350
│           0x00000854      417c011b       mul w1, w2, w1
│           0x00000858      0000014b       sub w0, w0, w1
│           0x0000085c      e103002a       mov w1, w0
│           0x00000860      00000090       adrp x0, 0
│           0x00000864      00602291       add x0, x0, 0x898           ; const char *format
│           0x00000868      96ffff97       bl sym.imp.printf           ; int printf(const char *format)
│           0x0000086c      00008052       mov w0, 0
│           0x00000870      fd7bc2a8       ldp x29, x30, [sp], 0x20
└           0x00000874      c0035fd6       ret
We can now see the sdiv, mul, and sub instructions here, which are combined to complete a modulo operation.
What about dynamic analysis?
For dynamic analysis, you will need GDB. With GDB, you can print disassembly, set breakpoints, inspect memory and registers, and even change the values of registers and variables while the program is running.
I have not explored dynamic analysis in depth yet. I may write a new blog post to explain dynamic analysis in the future.
Recommended resources
What I have explained is just the tip of the iceberg. To learn reverse engineering, you need to go deeper, practise more, and learn by doing. Below is a list of recommended resources:
- Pwn.college is a good place to get started. You can learn x86_64 assembly in their starter dojo, and then proceed to the Reverse Engineering part in the Intro to Cybersecurity module.
- Reverse Engineering for Beginners is a very good book on reverse engineering. It is free (as in freedom), licensed under CC BY-SA 4.0, and is available for download here.
- ARM offers official documentation for its AArch64 architecture.
- Here you can download crackmes to practise your reverse engineering skills.
- Here is a GitHub repository containing many resources for learning reverse engineering.
Disclaimer
This article is for educational purposes only. Please consult your local laws to learn what you may not do. I am not responsible for any of your actions.